 |
| Finished dartboard cabinet |
 |
| Cheap dartboard and darts - note the one dart has a shorter point... |
Initially I thought that I will quickly build a plywood box to house the board and call it a cabinet. However, when I started to plan it I thought that doors that have a arch to the top may be nice and from then onward the whole thing took on a life of its own. At many steps a simple element became more elaborate and following is a few pictures of how this cabinet evolved from a box rather than just being built.
After quick glance online I saw that most dartbord cabinets are a square box with 2 doors. I thus started by cutting the back and sides using the pine plywood and 2x4 cm beams.
 |
| Simple box at the start |
As mentioned the doors was where I started to change the whole thing from a mere box into a cabinet. This was of course due to the images on the interwebs of classical cabinets (I later found more information on cabinets and saw this video by DIRESTA - the video also inspired met to continue building something a bit more elaborate).
I therefore decided to make doors with arched tops. After I squared the doors I drew the top of one door and cut it on the scroll saw. I used this first one as template to mark and cut the second door. I spent a bit of time to sanding the doors together to get nice edges that are exactly the same.
 |
| Doors with arched tops being sanded |
 |
| Checking that everything is square |
I decided to stain the cabinet but first wanted to add a bit of detail to the front of the door along the edge. I made a cutting tool to cut along the edge and leave a thin line. This did not turn out as nice as I thought but I did have a straight line all around the edge of the doors. Using the Dremel with a I spent one evening carving (and then sanding) small half circles along the line. It looked much better but did take more time than i initially thought I would spend on the details on the door edges.
 |
| Adding detail to the door edge |
I tried a light oak stain and added two coats.
 |
| Testing the stain on the backside |
I found some hinges that were removed from a sandbox. I straighten, cleaned and drilled counter sink holes.
 |
| Old bent hinges |
 |
| Hinges like new after some work |
 |
| Checking fit of hinges |
 |
| Picture for front and scoreboard stuck to birch plywood |
 |
| Cutting on the scroll saw |
 |
| Broken...!?...nope - only half done |
 |
| Cat critically evaluating progress |
 |
| Image done |
At the same time I realized that we have no idea on how to actually play a game of darts. After more searching online I found a common and seemingly popular game called "Cricket" ( more information on the game here). This necessitated that a scoreboard was included in the inside of the cabinet. I thus designed the scoreboard. I did not want a chalk board and sanded the scoreboard in the middle section. This created a groove for a paper to slide in where we could write the score.
 |
| Cutting of scoreboard done |
 |
| Groove to be sanded marked |
Lastly I made some shelves to hold the darts and a pencil. Here it helped that the scroll saw table could be tilted. I drilled holes for the darts, cut a groove for the pencil and stained and glued the shelves to the door.
 |
| Slanted shelves |
 |
| Testing fit of darts |
After all the parts were cut I added 3 coats of lacquer to the cabinet and 5 coats of spray lacquer to the image and the score board.
 |
| Shiny door |
When all the parts were dry and shiny I fitted the doors to the cabinet and glued the picture parts carefully to the doors. Luckily everything seemed to fit nicely.
 |
| Right side of picture being glued to door |
 |
| Final clamping |
We tested the cabinet in the basement but Carina is hesitant to throw darts towards it (she thinks it is nice in the current condition and will not improve with the addition of holes). If we get a generous offer I will thus sell it ;) - Otherwise the plan it to place it in the jordkällare - and possibly buy better darts.
 |
| Doors closed |
 |
| Parts nicely sliding past each other... |
 |
| ...to reveal... |
 |
| ...a cheap dartboard... |
 |
| and some darts |
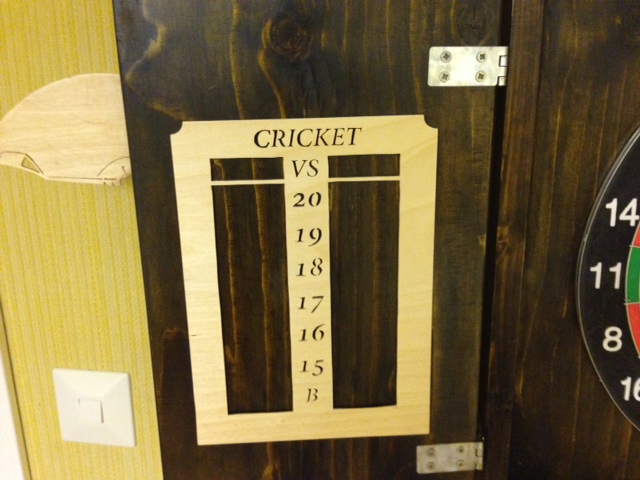 |
| The scoreboard |
 |
| Sliding in a paper (A5) |
 |
| Writing names and scores |
 |
| Nice detail on the edge :) |
 |
| Testing the cabinet |
 |
| Not a good score |
We have the feeling that this is a type of game quite often found in pubs and a future project is to install a bar next to the dartboard.
 |
| Opening in action |
R&C
cool sib
ReplyDelete